


How to Install Capsule Slip Ring Properly – A Detailed Guide
BY NBG
 2025-10-29
VIEWS: 1060

How to Install Capsule Slip Ring Properly – A Detailed Guide
A slip ring is a precision device. To install one, you must be familiar with its design, alignment, and power requirements. Most manufacturers would recommend you opt for professional services, especially for industrial or mission-critical applications. But if you're just working on a small DIY or hobby project and have the know-how of basic electronic and mechanical components, you can likely handle it by yourself.
To help you with that, below we explain how to install capsule slip rings, with a full explanation of tools and methods.
Prep for the capsule slip ring Installation
Here's the list of tools and materials you'll use in the capsule slip installation process:
● Small screws with flat and lock washers (for flanged models only)
● Set screws
● Flexible coupling (rubber tube, heat-shrink tubing, etc.)
● Anti-rotation dowel (~5/16″)
● Torque wrench or driver
● Insulation & strain-relief material
● Sealing/enclosure (if in a dusty/humid environment)
● Multimeter (for continuity testing)
Safety Checks
●Disconnect all power.
●Wear an ESD strap when handling sensitive electronics to prevent electrostatic damage.
●Inspect wire insulation and bearings—look for wear, and mount bearing supports to keep all mechanical loads off the slip ring itself.
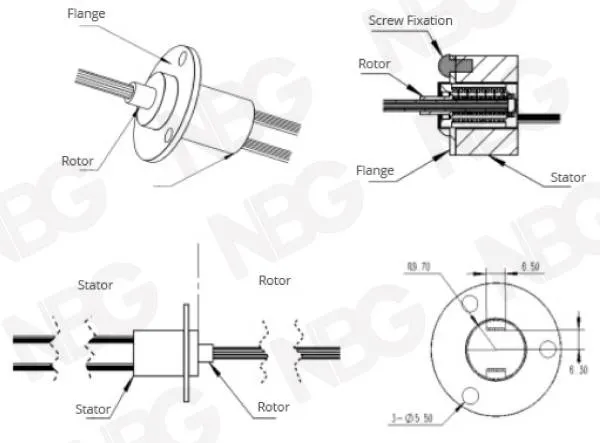
Mechanical Installation: Fanged Vs. Non-Flanged Capsule Slip Rings:
The steps to mount a capsule slip ring differ depending on its type.
●A flanged capsule slip ring includes a mounting flange (a circular lip) that allows the stator to be directly bolted to a stationary surface using screws and washers. These are easier to align and secure in standard enclosures.
●A non-flanged slip ring, also known as sleeve-mounted, does not possess a flange; instead, they are inserted or press-fitted into a cylindrical housing or bore. For mounting, they use adhesives, O-rings, or set screws and are often utilized in confined spaces or where a flush mount is required.
The other basic components of slip rings are basically the same:
●The stationary part
●The rotating element
●Anti-Rotation Tab
●Wiring Leads
●Bearings
Now, let's proceed with the actual capsule slip ring mounting guide. We have outlined the process for both non-flanged and flanged varieties, with some variation.
Step、 | Flanged Slip Ring | Non-Flanged (Sleeve-Mounted) Slip Ring
|
1 Mount the Stator (Fixed Side) | Position the flange over the mounting surface. Insert the flat washers first, followed by lock washers. Secure tightly but do not over-torque. This will become a stable base. | Gently press the stator body into the sleeve or housing bore. Secure it in place using adhesives, set screws, or O-rings. |
2 Secure the Rotor to the Shaft | Slide the rotor onto the shaft and secure with set screws torqued to ~25 lb-in.
Install anti-rotation dowel through tab to prevent stator from rotating. | Insert the rotor onto the shaft and attach rotor wires.
Then install the anti-rotation tab. |
Continue onward, same for both types.
Note: Use some kind of flexible coupling (such as rubber tubing or a heat-shrink sleeve) between the rotor and shaft to allow minor misalignment and minimize internal bearing stress. This will also provide long-term longevity.
Wiring & Electrical Hook Up
Once done with mechanical mounting, it is now time for the capsule slip ring wiring. Carefully routed, strain-relieved wiring configuration is crucial to secure your slip ring from early failure and clean transmission of signal or power.
1. Label and identify rotor vs stator leads: Rotor leads are usually colored and leave the rotating side; stator leads leave the stationary body. Check the datasheet or color code chart of the slip ring to further confirm what wire is hooked up to what channel.
2. Connect rotor leads to rotating-side components: These can be motors, sensors, antennas, or any rotating component with a shaft. Solder or terminate each lead in a secure manner, and protect exposed connections from contact with heat-shrink tubing or terminal blocks.
3. Connect stator leads to stationary systems: These connect to the power source, signal processor, or controller, which are normally mounted outside.
4. Verify wire function and polarity: Double-check that rotor-stator leads are connected correctly (Channel 1 to Channel 1, etc.). Do a continuity test using a multimeter before powering up, to be sure.
○Don't have loose wires hanging around—secure right at housing entry with grommets, zip ties, or insulated clamps.
○Aggressive curves close to the slip ring exit can cause conductor fatigue. Use soft loops instead and employ heat-shrink tubing or cable clips.
○Ensure all leads—especially on the rotor side—have enough length and flexibility to rotate fully without pulling.
Testing Before Full Assembly
Before sealing your slip ring setup, do a round of testing to verify alignment, signal transmission, and smooth rotation under real-world conditions. Here are a few slip ring integration tips.
1.Manually rotate through the full range: Slowly turn the shaft manually and listen for rubbing, scraping, or off-center resistance. The action must be smooth and centered. Binding suggests misalignment or over-tightening of parts.
2.Power up the system at a low rotation speed: Power on gradually and observe. Look out for unusual vibrations, clicking noises, or heat build-up around the body of the slip ring.
3.Test signal and power integrity: Test for clean signal transmission and stable voltage or current using a multimeter or oscilloscope. Erratic readings could be due to a loose wire or worn contacts.
4. Check concentricity and coupling alignment: Visually check the slip ring as it rotates. If you do detect wobbling, readjust the shaft and coupling material.
Common Issues & Fixes
Since slip rings are highly sensitive and demand accuracy, you could face issues even after following the installation guide. We're covering some simple ones here, along with their causes and how to troubleshoot.
Problem | Likely Cause | Fix |
Signal noise or dropouts | Improper grounding or EMI interference | Ground the stator securely; use shielded cables and avoid signal-pair twisting |
Overheating | The electrical load exceeds the slip ring's rated capacity | Reduce load or upgrade to a higher-rated slip ring |
Sticking or jerky rotation | Misaligned or overloaded bearings; rigid mounting | Realign supports; use external bearings; avoid hard-mounting both ends |
Unreliable electrical contact | Worn brushes or internal wear | Replace brushes (if accessible); contact the manufacturer for service |
Wire fatigue or breakage | Tight bends or lack of strain relief | Use cable clips, heat-shrink, and provide adequate slack |
Dust or moisture ingress | The slip ring is not sealed for the environment | Use IP-rated housings or add an external sealing enclosure |
Mechanical vibration | Shaft misalignment or loose coupling | Adjust flexible coupling; re-torque mounting screws |
Slip ring housing damage | Attempted internal disassembly or excessive load stress | Never open sealed units; route loads through external support bearings |
Intermittent operation | Loose terminals or unstable mounting | Secure wiring; check all fasteners and anti-rotation tabs |
Early wear or failure | Axial/radial loads are applied directly to the slip ring | Use external support bearings to offload mechanical stress |
Note: Opening the slip ring assembly may jeopardize performance or invalidate the warranty. Always refer to the supplier or a qualified technician for internal faults.
Conclusion
Installing miniature slip rings can be divided into three core phases: first, you mount the mechanical parts, then wire the electrical and signal connections, and finally, perform operational validation. Though there could be a few additional specificities depending on what machinery it's being mounted in, what your purpose is for it, or if it's custom-designed.
NBG Innovations Group Pte.Ltd.
#13-13A, International Plaza, 10 Anson Road, Singapore (079903)


Navigation
 HomeSustainable
Product

NBG
INVITATION